 Contact
Looking for the right Product
or having questions?
Request sample
PVA Product finder
The iPROG EEPROM adapter is a powerful tool for portable automotive electronics work. By understanding the standard pinout assignments, following the step‑by‑step connections for common chip families, and applying the troubleshooting techniques outlined above, you can perform reliable EEPROM operations in any environment—workshop or field.
⚙️ The iPROG+ software includes built‑in scripts to automatically configure the I²C bus speed and addressing. No manual pin reassignment is required.
The iPROG EEPROM adapter’s pinout follows standard SOIC8-to-DIP8 mapping (1:1). It is mechanically portable but electrically sensitive to cable length and vibration. For reliable field work, use short, high-quality cables, reinforce mechanical joints, and carry a spare.
This guide provides a comprehensive breakdown of the iProg EEPROM adapter pinout, wiring schematics for common eeprom families, and practical tips for creating a portable, reliable programming kit. 1. Understanding the iProg+ Hardware Architecture
DIY EEPROM programmer kits are available for purchase. These kits usually include all necessary components, including the microcontroller, socket for the EEPROM chip, and pin headers for connecting to a computer via a USB or serial interface.
The series is a staple in automotive electronics for tasks like odometer correction, airbag resets, and immobilizer programming. Central to its versatility is the EEPROM adapter , which allows technicians to interface directly with memory chips like the 24C, 93C, and 95 series. Understanding the pinout and portable connectivity options is essential for performing reliable "in-circuit" or "on-bench" reads without damaging sensitive modules. 1. Essential EEPROM Adapter Pinouts
Frequently used in Toyota, Lexus, and various dashboard clusters. CS (Chip Select). Pin 2: SK (Serial Clock). Pin 3: DI (Serial Data Input). Pin 4: DO (Serial Data Output). Pin 5: GND (Ground).
Address Lines (Usually tied to GND) Pin 4 (GND): Ground connection from iProg Pin 5/38
The iPROG+ programmer has become a versatile tool in automotive diagnostics for tasks like odometer correction, airbag reset, and key programming. Understanding the EEPROM adapter pinouts is essential to the success of these operations. Whether you are a workshop professional or a portable service technician, mastering these connections ensures safe and effective chip programming.
🛠️ Portable EEPROM Tuning Setup! 🛠️
: The software allows you to toggle between different voltage levels (e.g., 2.6V, 2.8V, 3.3V, 5V) depending on the specific EEPROM chip's requirements (such as the 35080 or 24C series). Supported Chip Types
Open the iProg software, select the "EEPROM" tab, and select the specific chip type (e.g., 24C04, 25C160).
The 24Cxx family (e.g., 24C02, 24C16, 24C256) is widely used in dashboards, radios, and airbag modules for storing configuration data. The connections follow the I²C two‑wire interface.
Sometimes, the PCB components (resistors, capacitors) interfere with reading. If you get read errors, you may need to desolder the chip.
To provide a practical example, here are excerpts from real-world use cases:
Some manufacturers offer handheld versions of the iProg EEPROM adapter. These are compact, battery-operated, and designed specifically for fieldwork or situations where a computer isn't readily available.
Be the first to know what’s new in Kuraray’s polyvinyl alcohol product portfolio!
Subscribe now Contact
Looking for the right Product
or having questions?
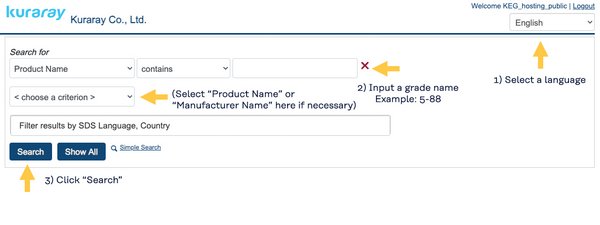
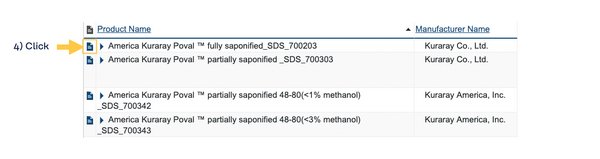
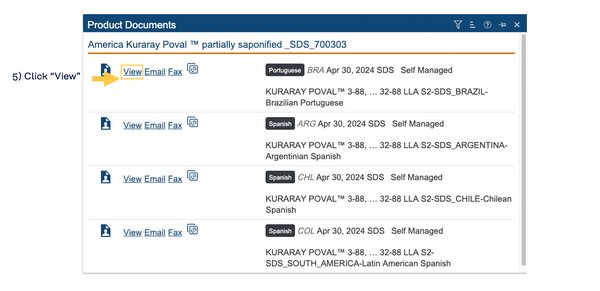
KURARAY POVAL™ Library SDS Library


Do you have any questions, need technical support or would like to request a sample?